
How Can You Take Better Wildlife Photographs? – Try My Pre-Visualization Techniques
In my recent posts, I have been discussing research and pre-visualization. But what exactly is pre-visualization, and how can it have a positive impact on your wildlife photography?
Let's dig a little deeper in this post and discuss what steps I go through when I am pre-visualizing images before I even take my trips. To help illustrate my points, I am going to use the Canada Lynx as the animal I am researching and pre-visualizing.
Where am I looking for information?
Videos on streaming services.
There is a plethora of information out there on streaming services. From professional-quality videos from companies like BBC and Netflix, you can watch segments that discuss the Canada Lynx's physical attributes, the environment where they live, how they sound, and the prey that they feed on.

I also found amateur videos on Youtube that show the Lynx in its environment. These were valuable resources to see (a) how close people are getting to a Lynx in the wild, and (b) how the Lynx reacts to people in real-world encounters.
Google information Search
There is so much information out there to be read. Nat Geo, BBC, Wikipedia, WWF, and Hinterland Who's Who all have beneficial information that you can read when researching the Canada Lynx. – Height, weight, familial groupings, food sources, and areas where you can find them.

Google Image Search
This is a great exercise to start to key in on the kinds of photos you hope to capture. This is where your research turns to pre-visualizing the kind of images you hope to take while you are on your trip. When I first decided I wanted to photograph the Canada Lynx, I would save these images on my iPhone. I saved the specific photos because I liked the body positioning or liked the accompanying environment in the pictures.
I never expect that I will walk into a photo shoot and capture what I saved on my phone. But the images allow me to look at them repeatedly, keeping this wish-list top of mind. I will actually look at them each morning while I am on my trip. I find it a good exercise to do over breakfast.
What am I looking for when I am Pre-visualizing?
As I go through all this research and begin to visualize the images I want to capture, I formulate an opinion on the key characteristics I want to photograph.
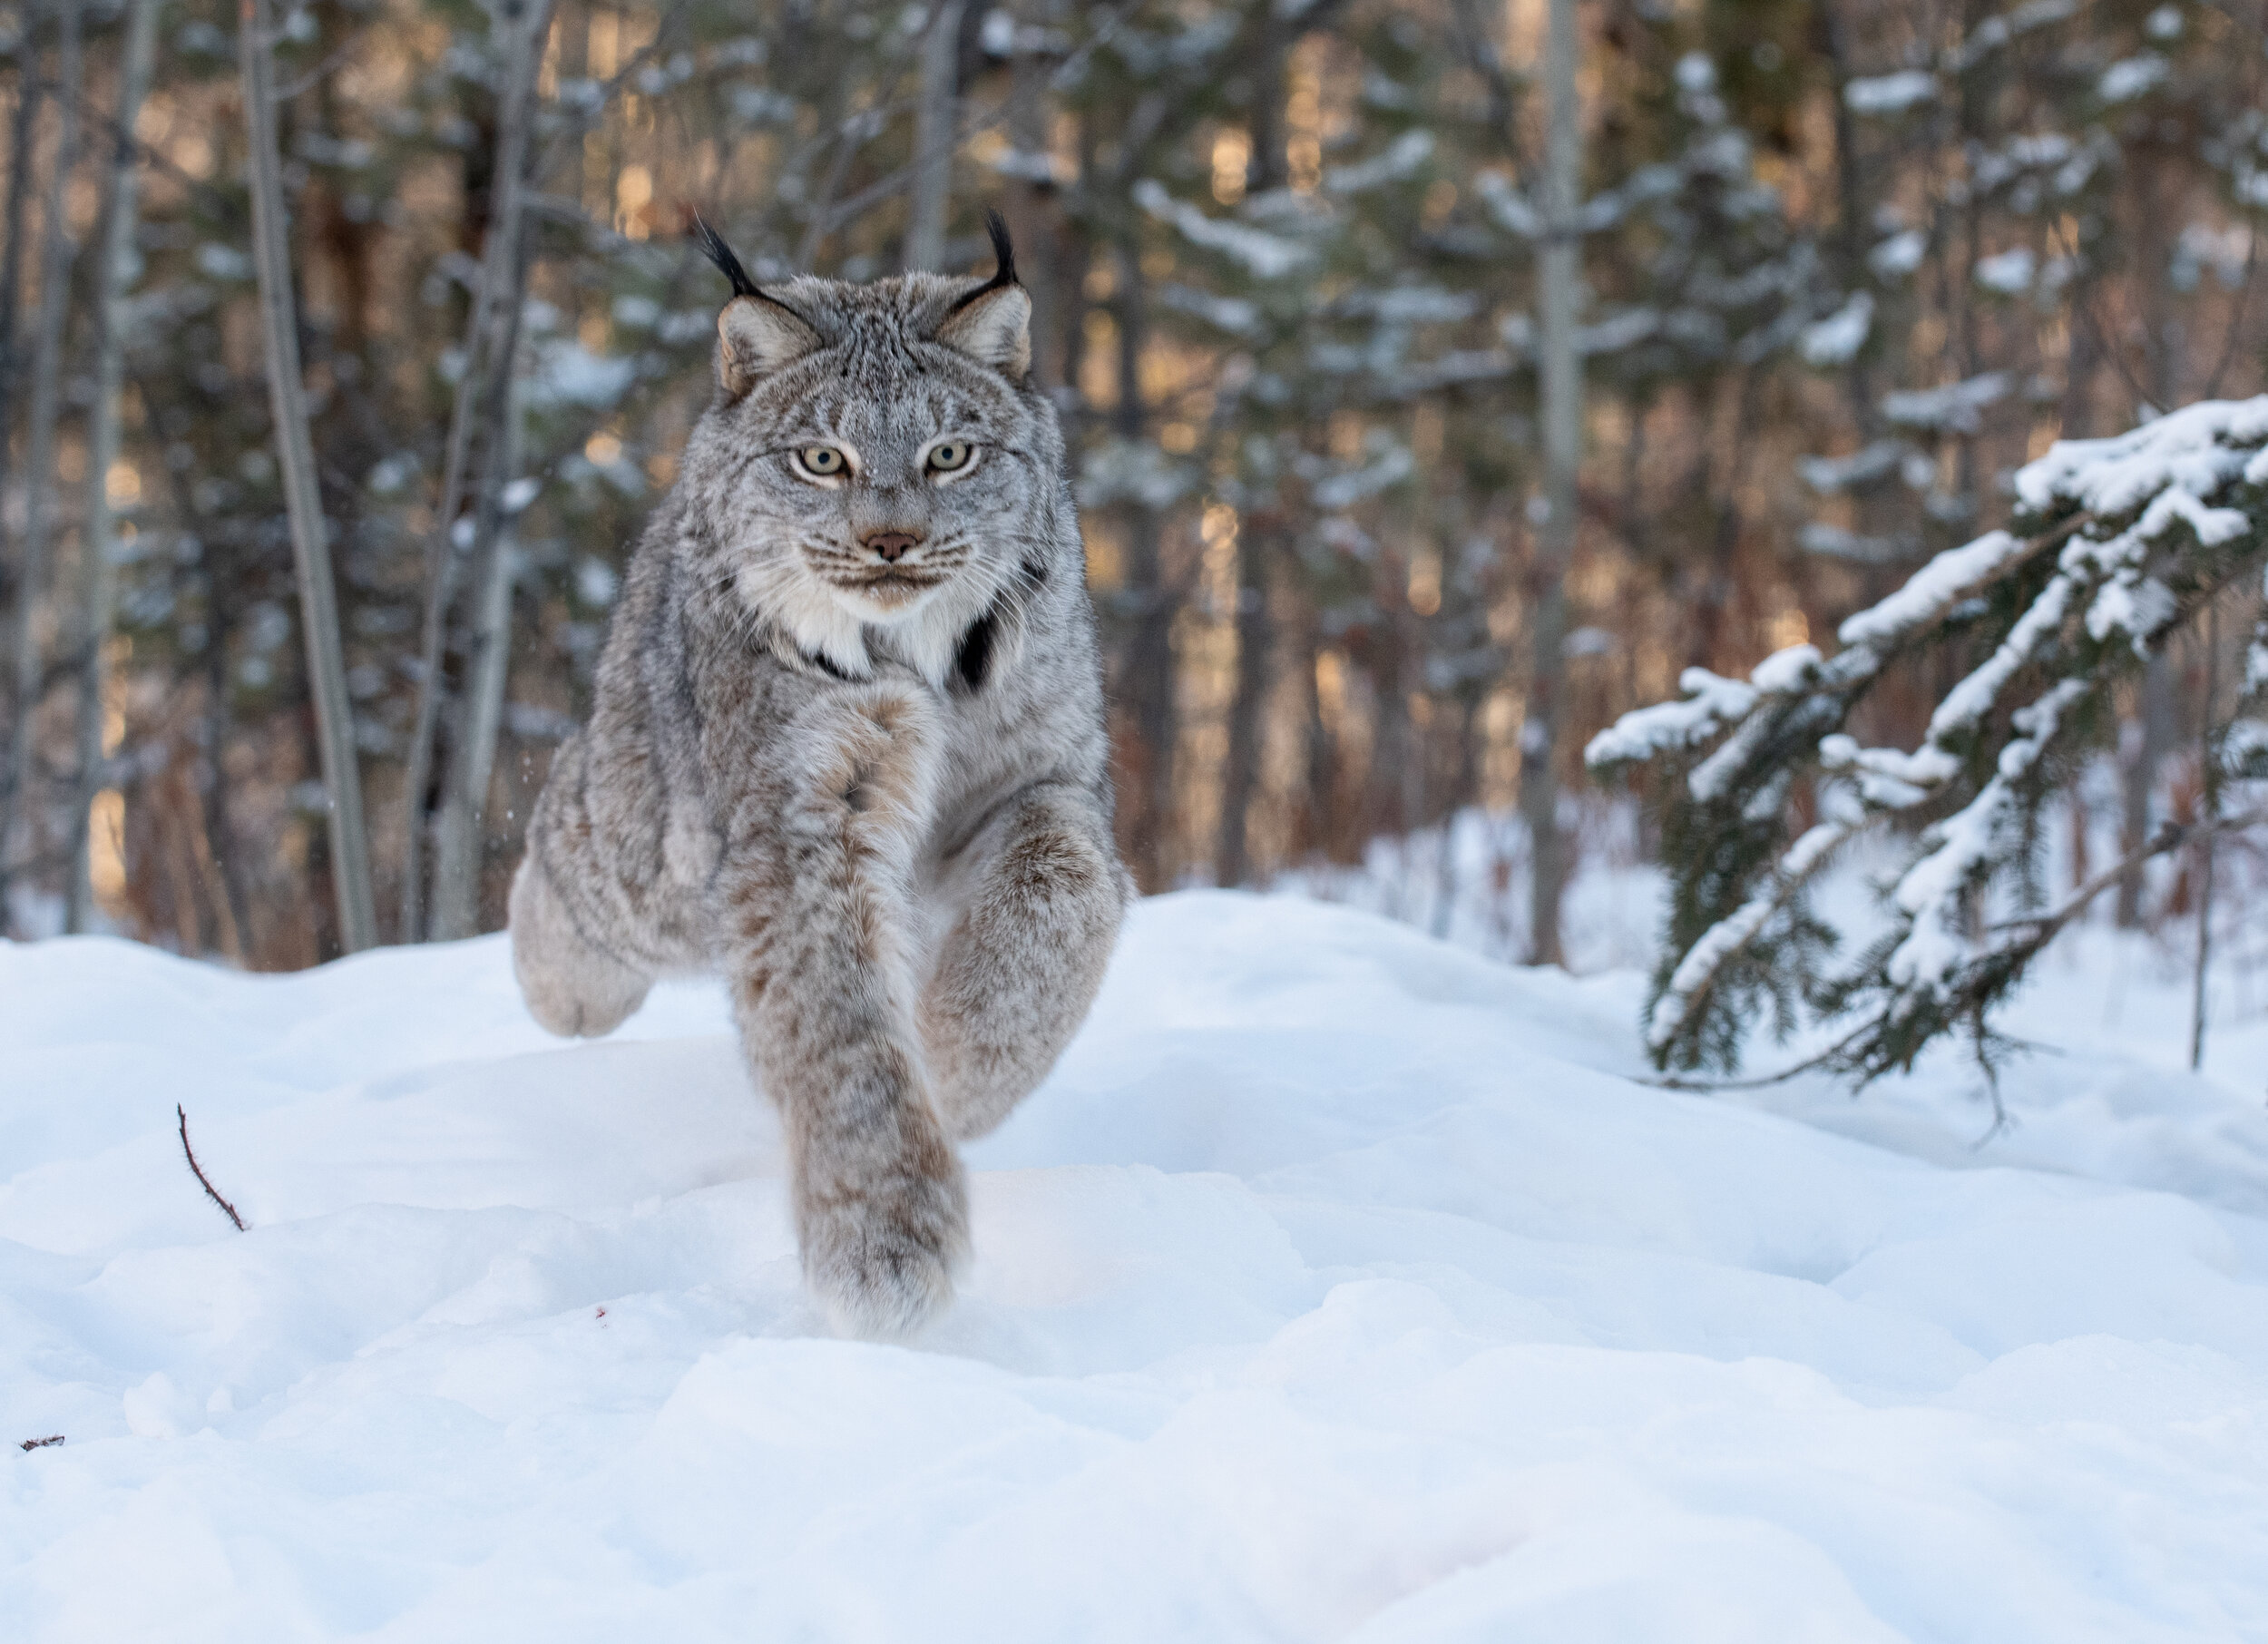
The Lynx have massive paws that allow them to walk on snow as if they are wearing snowshoes. They lift these huge paws when they walk. How could I capture them?
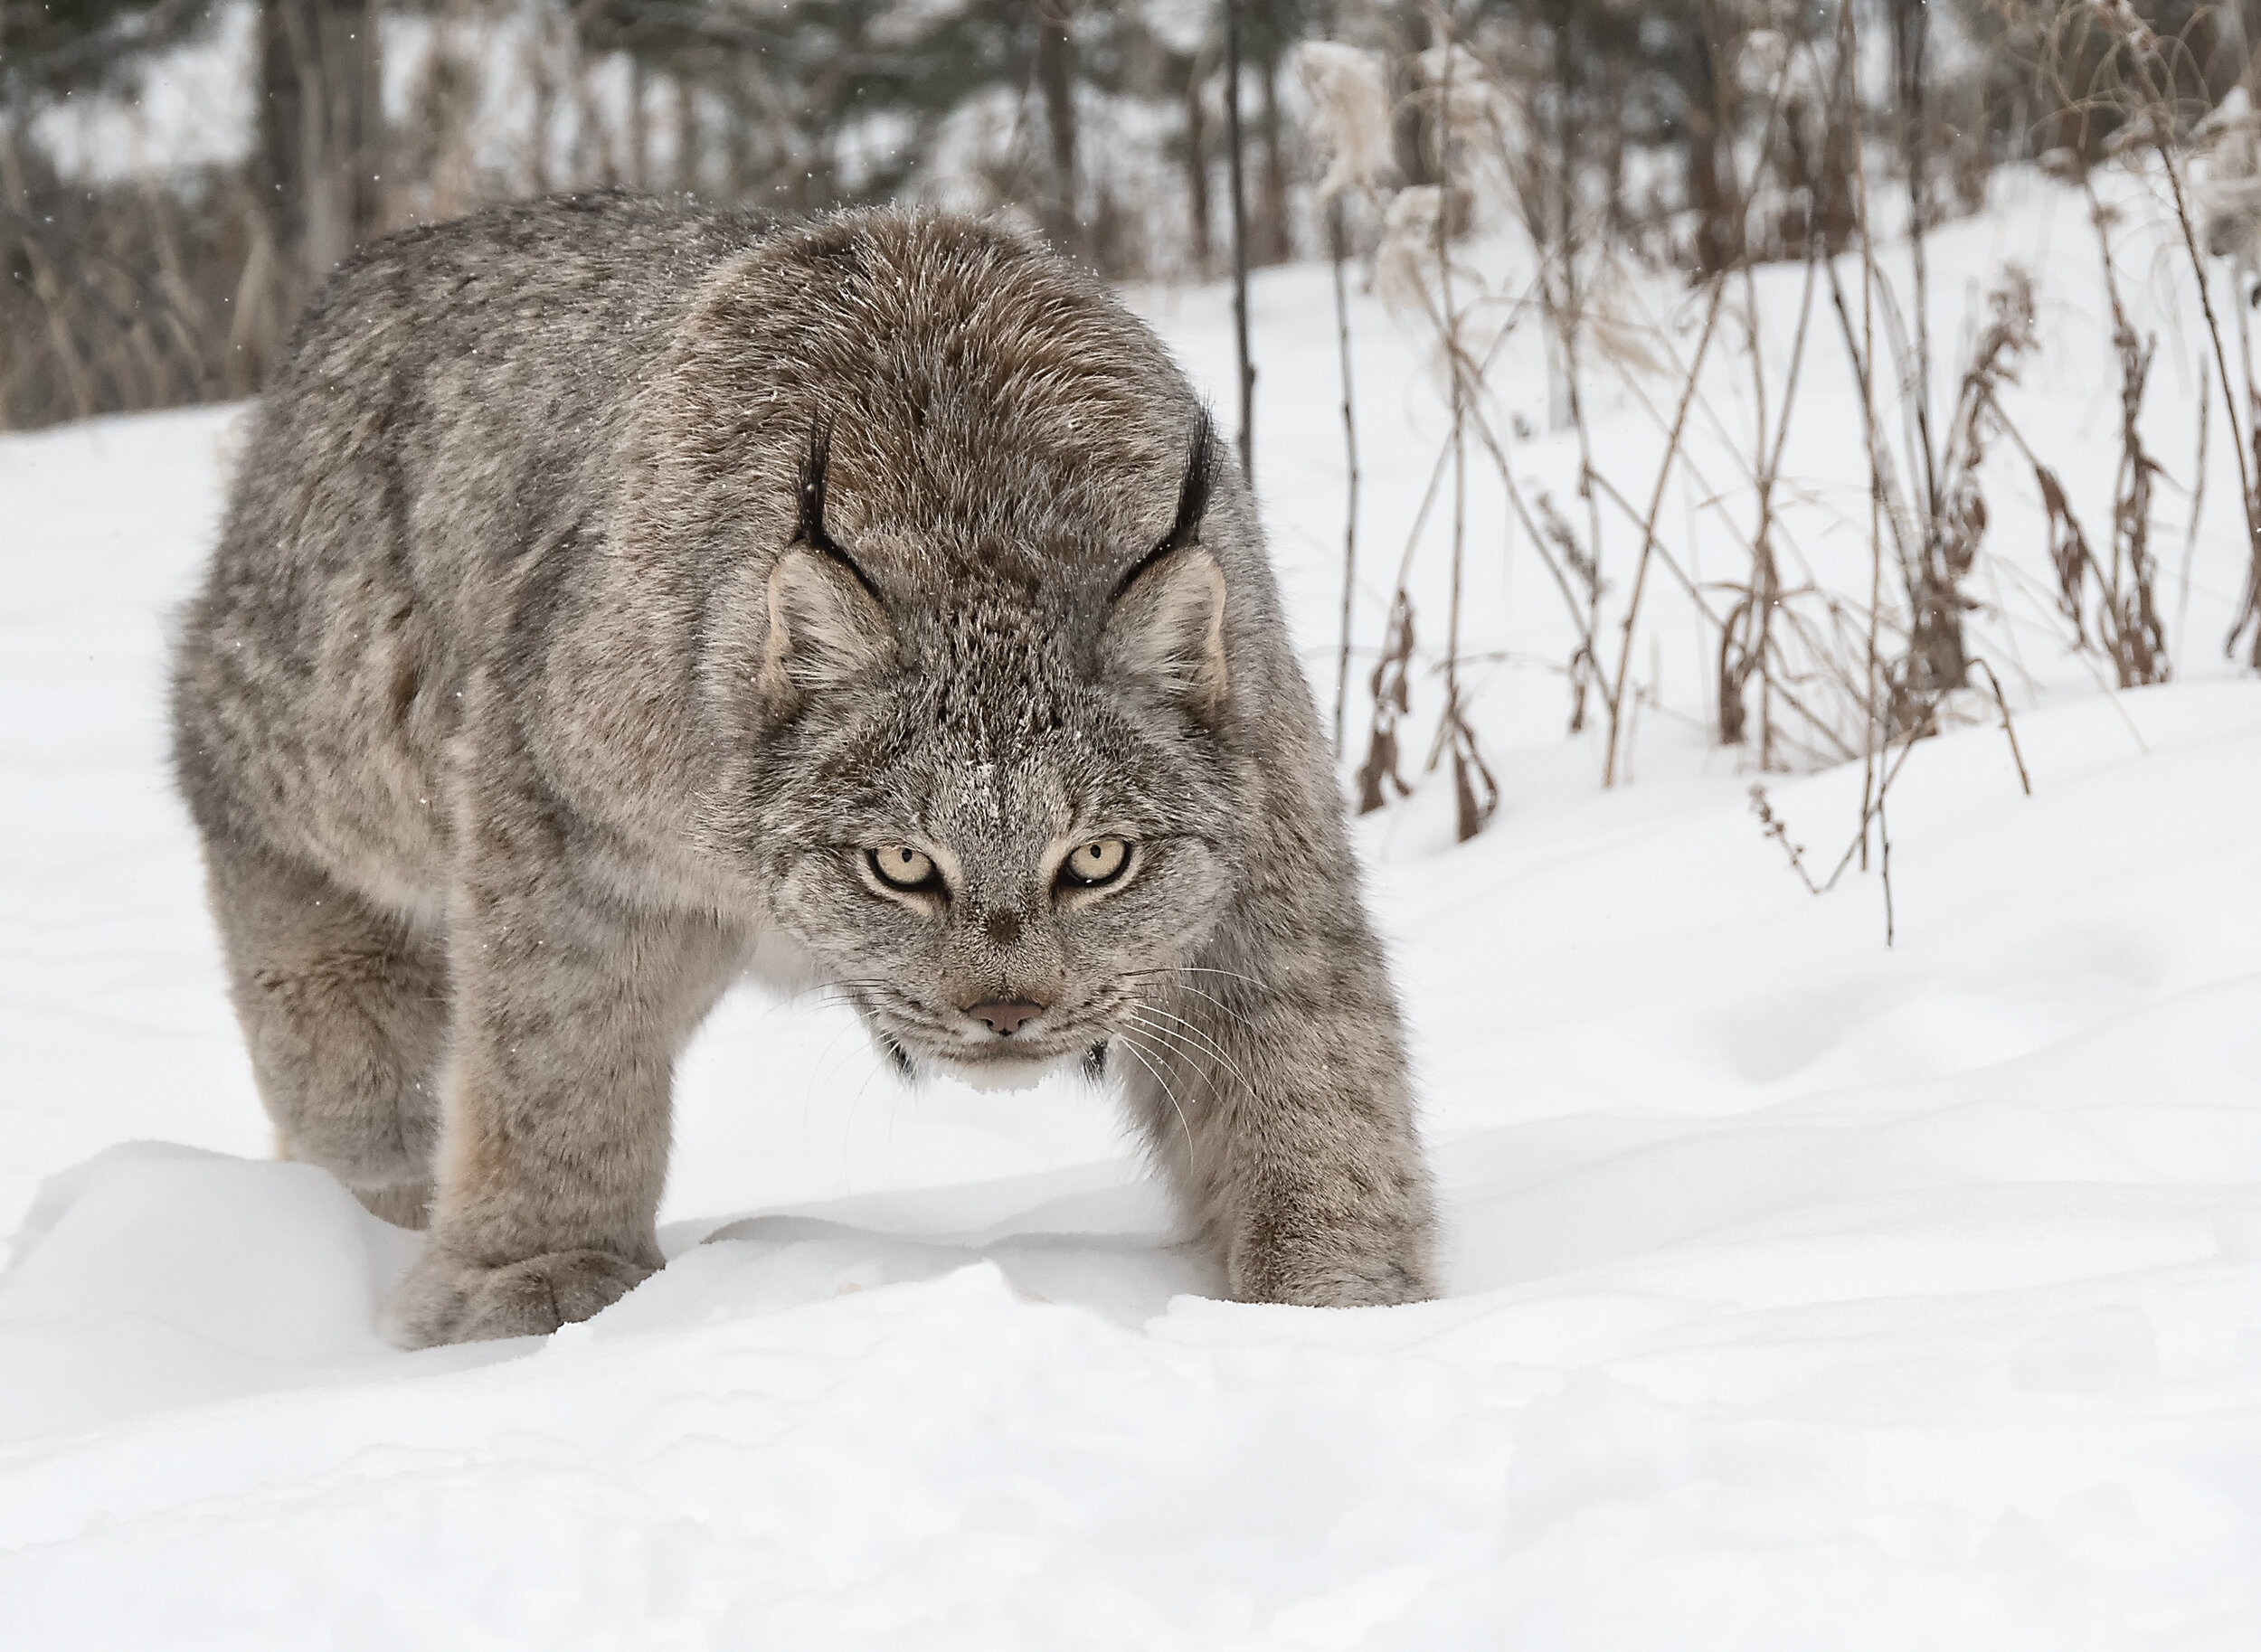
They have this sweet face with very distinct coloring. Within this face, Lynx have piercing eyes that would create a powerful connection. – I needed to keep this in mind.
The Lynx does not only hunt on the ground. They also like to climb. I needed to remember that and watch for this behavior.
I saw images and videos of Lynx running. They had a long body with strong rear legs used for propelling them after prey. – I wanted to show off those powerful legs.
Now that I had my photography wish list, I wanted to keep these images top of mind. But keeping this wish list top of mind is not enough. You need to envision how you are going to capture them.
You are starting to think about the gear you will need to photograph the Canada Lynx. – long lens – cameras with higher frames per second – do I need a tripod or gimbal head?
What is the POV required to capture the attributes I pre-visualized? - Will I have to get low? If I am in a blind, how do I stay hidden while on my belly?
What depth of field will I need to use? – Using Photopills, I started to look at apertures I needed at different focal lengths and distances to have a Lynx in focus from front to back.
What shutter speeds would I need if they run? – My research showed me that Lynx's top speed is 80km/h (50mph). What shutter speed would freeze that action? I needed to keep that in mind while in the field.
If I needed an aperture of ƒ5.6 at 200' to have the Lynx in focus, and I needed to shoot at 1/1600th of a second to freeze the action, what ISO would I need to anticipate using? – If I was in shaded areas, how is my camera going to handle ISO1600, upwards to ISO6400? These high ISO’s used to scare me. Not anymore. Why? Because I learned how to shoot at these ISO’s near my home before a trip.
What are the background challenges that will be encountered? - Is it a dark environment – will I struggle with tangents because of trees? Is there snow? What settings in my camera will help me take photos of darker animals with so much snow surrounding them? (psst… the answer is adjusting EV compensation) – learning how to photograph in the snow is all part of your research before you go on your trip. You don’t want to be fumbling with settings in the moment.
Will I need a blind? – Depending on where I find tracks, I may need permission to erect a blind.
What is the climate I will be in? – I need appropriate clothing and gear.
All this research may seem like overkill to a lot of you reading this post. You're probably a more experienced photographer and this may be second nature to you.
Some of you may look at this list as daunting. But the research and pre-visualization for any photo outing will decrease as you gain experience.
Regardless of your experience, it's always a good exercise to go through. Would you walk into your final college exam without studying? Why would you leave your photography success to chance when you spend thousands to go photograph an animal.
Real-World Implications
Let's look at how this pre-visualization helped me take some of my favorite Canada Lynx Images.
Camera: D500, Lens: Sigma 150-600 ƒ5-6.3 Sport, Aperture ƒ6.3 Shutter Speed of 1/1600th of a second, ISO400
If you think back to what I wanted to capture, one thing I wanted to capture was those piercing eyes. This Lynx stopped dead in her tracks because I moved. She was walking, and an adjustment of my body created a noise that she did not like. The ears went up, and she stopped in this aggressive stance.
I would have liked some seperation with the bush on the right side. But I could not move any more than I already had. I risked scaring her off.
Camera: D850, Lens: Sigma 150-600 ƒ5-6.3 Sport, Aperture ƒ6.7 Shutter Speed of 1/350th of a second, ISO2000
I wanted to show off those huge paws if the Canada Lynx. I knew if I wanted to capture them, I needed to lay down.
I positioned myself 5 feet below a ridge line of snow. If I happened to see the lynx come from above me, I would be able to capture those large paws. I decided on this particular image because it shows three of her four paws elevated off the snow.
I also liked the orange coming through the tree line. It added a nice element and tells you I was out photographing this animal early in the morning, or late in the day.
It was actually early in the morning. Lynx are generally nocturnal. My research told me I needed to be out early in the day and late in the day to have the best chance to photograph them,

Camera: D500, Lens: Sigma 150-600 ƒ5-6.3 Sport, Aperture ƒ6.3 Shutter Speed of 1/1250th of a second, ISO800
This situation allowed me to combine three of the three elements I pre-visualized. – Her eyes, her huge hind leg, and that massive front paw.
I had looked through my images as I ate breakfast. That 5 minute exercise reminded me what I wanted to try and capture on that day. It kept the paw, the eyes, and the hind legs top of mind.
It helped that there was a slight snowfall that added a nice element to the image. :-)
Conclusion
You might be thinking, “that seems easy, I could probably get those images even without pre-visualization and research.”
I would respond and say, “Probably not!”
Research told me what my weather conditions were going to be at these times of the day. I knew I had to prepare for possible -50F temperatures. If I wasn’t totally comfortable in warm clothing I would never have had the patience to wait for these images to present themselves.
Pre-Visualization and research lead me to talk to trappers about the Lynx in the area. The trappers told me what to look for when I am looking for the Lynx… and their trap locations. The last thing I wanted was to step into a wolf or bear trap when out of cell range. The trapper told me how the Lynx use tree lines to conceal themselves. I learned how they use the backroads as ambush locations for prey. I found fresh tracks, talked to the landowners, and erected my blind that I left it there for days so the wildlife could become accustomed to it.
Research taught me where their food source liked to live. That would be where the Lynx likes to hunt. Visiting these locations allowed me to identify sun locations at all times of the day so I did not have to struggle with bad light if a Lynx showed up.
When I was watching videos during pre-visualization I noticed how they ran and what position the paws are in throughout the stride. I knew the optimal time to click the shutter in short bursts that would not startle a Lynx. If I hammered the shutter at 11fps my time with the Lynx would have been much shorter. My shutter would have scared her away.
If you learned some valuable tips by reading this post, you will like my new eBook – Wildlife Photography, Five Key Elements For Success. We discuss twelve (12) wildlife scenarios and also discuss what the most common photography mistakes are, and how to learn from them.